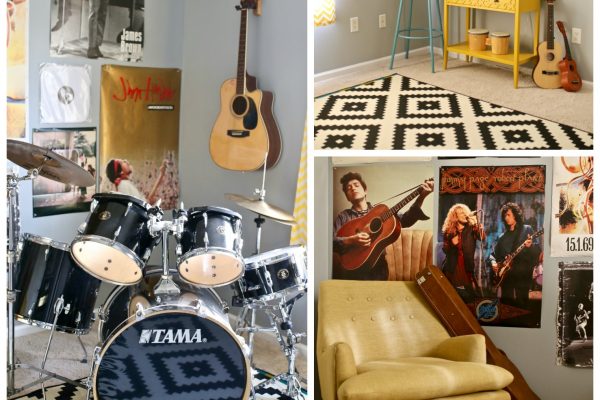
6.19.2013

The Lucy Halter Dress: Pattern Review and Giveaway!


As you guys know, I love to sew and it sometimes seems like all I make are clothes for Ethan and Ainsley.  So, when Scientific Seamstress contacted me and asked me to try out one of her awesome patterns, I knew immediately that I would use this opportunity to make myself something.   

Plus, keep reading for your chance to win a pattern of your choice!

The Sis Boom Lucy Dress... perfect for our beach vacation.

This was an awesome pattern!  I can't rave enough about the professional step-by-step photos and drawings, excellent directions, and endless options for pattern variations.  The Sis Boom Lucy Dress can be made in multiple lengths:  top, short dress, knee length, and maxi.  I chose the short dress and I think I might make the top length next.   There are also coverage options (I chose the full coverage option), which makes it so easy to customize to suit your needs and your body type.


The back of the dress has elastic for a custom fit.  I did have to shorten my elastic by about 1.5 inches in order for it to fit me properly, but I think elastic is always one of those things that need to be adjusted according to your own measurements.

Between printing the pattern, cutting the fabric, and actual sewing, I was able to make this dress in under 3 hours.  Not too shabby!
I love the fit and the design and I would highly recommend this pattern and all of the other ones in her Etsy Shop.


One of you will be lucky enough to win a Scientific Seamstress pattern of your choice!

Here are some of my other favorites that I hope to get soon!

Easy Girl's Dress
Easy Girls Dress Pattern and Top Pattern, Simply Sweet, Boutique Pattern PDF E-Book

Sis Boom Jamie Dress with Scientific Seamstress Pattern and Instructions, PDF E-Book

Sis Boom Angie Dress
Easy Womens Dress Pattern - Sis Boom Angie Dress, PDF E-Book


So, go ahead and enter between now and June 26th with the easy entries below.

Good luck!


a Rafflecopter giveaway

6.18.2013

My Boyfriend's Apple Pie: Recipe

Today, I am happy to have my friend Brianne over here to share a yummy apple pie recipe with all of you.  She has mad sewing skills and a great sense of humor, so make sure to check out her new blog Ali Cat and Co.   Thanks Brianne!
*************************************************

Thank you Hayley for having me guest post.  You are an awesome person!

My sophomore year in high school, there was a new boy.  
(I'm sure all of you remember that feeling!) 
And he was SOOO cute!  He started dating a friend of mine.  Every single girl in the school was jealous.  Lucky for me, he was in my Spanish class. Hola, guapo! At the end of the semester he began talking to me a lot and we started hanging out during winter break.  He had broken up with
"the other girl" a few weeks before.  If he told me the reason why, I don't remember.
Who wants to talk about other girls when you have a hottie senor looking you in the eyes?

We officially started dating before school began for the spring semester.  When my friend
found out she was no longer my friend.  She was pretty peeved at me, to put it nicely.  Double lucky for me, she was super tall and skinny and got picked up by a modeling agency and flew
out to Spain for 5 months to model. 
(I heard she did topless pics on the beaches, but I was never able to confirm that.)

At some point, I met his family for the first time.  We had dinner at his house.  His mom had made
an apple pie.  It was love at first sight.

Well, he graduated and moved on to college.  I had enough credits to skip my junior year.  We
did a long distance relationship my senor year.  I was accepted to University of Texas so he transferred there.  

We dated 4 years. Every time I saw his mom, she always had an apple pie for me.  
For my high school graduation gift, she gave me a recipe box full of her recipes including the apple pie.

Technically I cannot take credit for the recipe, so we can all thank my 
ex-boyfriend's mother!

Thanks for hanging in there with me!  On to the recipe!

For you go-getters: here is the recipe and quick instructions.  
For the people who like pictures and tips/tricks, see below.

My Boyfriend's Apple Pie Recipe

4 Granny Smith apples, cored and sliced 
1 stick butter
1 cup brown sugar
1 cup white sugar
1T cinnamon
2T flour 
Pie shell 
(one pie shell if you want crumble topping, 2 if you want shell top)

Crumble topping
3/4 cup flour
1/3 cup brown sugar
1/3 cup white sugar
1 tsp cinnamon
8T butter, chilled  and sliced

1.  Peel, core, and slice apples.  Boil on stove top for about 10 minutes or until soft
2.  Strain water out and put apples back into pot.
3.  Add butter, brown sugar, white sugar, and cinnamon to pot.  Gently fold everything together
until butter and sugar are melted.
4.  Add the flour
5.  Pour all of that goodness into your pie shell. 
6.  Top with your crumbles (see below) or other pie shell
7.  Bake at 350 for 60 minutes.

Crumble Mix
Put all ingredients in pastry blender and blend until crumbly.  
You can also do this with your hands/fingers.

Now, for those who like pictures, tips and tricks, and further rambling. 

Gather all your materials.  Cover the baking sheet in foil.
Just in case the pie gooey goodness leaks during baking,
you won't have to scrub it off.

 Put on your favorite apron.  My sister in law
made this for me several years ago.
"Brizee's Bakery.  Button Bustin' Good!"

Grab your big pot and boil some water (about 2/3 the way up on the pot).
Peel, core, and slice your apples.
I like to get about 6 slices per apple.  
You don't want thin or super thick
slices.

Once the water is boiled, carefully lower those slices into the pot.
I say carefully because getting splashed by boiling water
is not fun. Boil until the apples are soft enough to stab a fork but pull them out 
before the apples begin to peel apart and turn to mush.

 While the apples boil, grab your pastry blender (or a bowl 
if you want to use your fingers)
Slice your chilled stick of butter.
Throw all crumble topping ingredients into the blender (or bowl)
and blend it up (mush and press together with fingers).
 Here's what it should look like.  You might need to use your fingers 
to get good crumbles.

 Apples still boiling?  Grab a snack and check Facebook.

 And move that puppy on a string that you continue to trip over.

Oh yes, apples stab-able but firm.

 Strain out that water.

Return the apples to the pot (stove turned off).  Carefully fold brown sugar, white sugar, stick of butter, and cinnamon.  You don't want to mash those apples! Let's keep them in nice slices.
Continue to fold until everything is melted together.

Fold in the flour.

I like to transfer the apples to the pie shell first and arrange them nicely.

Pour butter/sugar liquid on top of apples until the apples
are coated (you might have some liquid left over)

Throw on that crumble topping! You want to cover every centimenter
of the top.  A good covered pie won't leak, unless you overflowed it
like I did here.  Doesn't matter either way, it will still taste delicious!

*If you want a crust top.  Take that other pie crust you have and lay it on top of your pie.
Remove any crust that hangs over the edges then pinch the two crusts together on the edges.
Make a few holes on top of the crust for breathing.*

 Slide that baby in the oven.  Bake at 350 for 60 minutes.  
Check at the 40 minute mark.  You pie will be brown on top. Don't be fooled; it's not done yet!
Get a small piece of foil and slide it on top of your pie.
Let it bake 20 more minutes.  The foil will prevent the top from burning.


As I mentioned before, I poured too much liquid in my pie and it overflowed during baking.  
No big deal.  This is why you want to make sure your pan is foil lined.
When you move to the pie to its final resting place, no one will know.

I immediately swept this pie away to a party with the intention of finding a willing participate
to eat a piece so I could take a picture.  By the time I made it back to the pie, it was all gone.
Well, shucks. 
One guy, who apparently ate two pieces, told my husband
"You need to get your wife to tell my woman the recipe because
your wife stuck her foot in that pie."

I have NO idea what that means but I'm taking it as a compliment!

Thank you for reading my guest post.  If you try out the recipe, please let me know what you think!
If you like the pie and want to see more recipes in the future, let Hayley know.  
I have a strawberry bread recipe that is to die for!

6.17.2013

The Fabric Hutch: Furniture Redo

Week 1 of So You Think You're Crafty has been completed!
Voting is up for the Week #2 Entries:  Upcycling
Head over to vote for your favorites!  (click HERE)

Did any of you correctly guess my entry last week?
Well, guess what…. it won this week!
Isn't this going to be beautiful in my new sewing studio??


I found this heavy oak china cabinet on Craigslist for $50
(you know I love me some Craigslist furniture)

I removed the doors, used my spray gun to paint it a lovely blue, switched out the hardware, and of course, added some beautiful Amy Butler Home Decor fabric to the back of the hutch.

By the way, the fabric is completely removable!  I will be sharing that tutorial shortly…. you will want to use this technique all over your house, I promise.

Oh, and I will also be sharing a NEW tutorial for painting furniture soon!  Remember my old tutorial found HERE?  Well, it is one of my most popular posts, but I have an easier way that I will definitely show you.

Not only is the back lined with fabric, so are the drawers!
What a fun pop of excitement


The new hardware was purchased at Lowe's on clearance.
Because the old drawer pulls and cabinet handles were larger than my new hardware, I did have to putty the old holes and re drill new ones.  However, it was absolutely worth the work.


Right now, this piece is sitting in our breakfast area because my new sewing studio isn't finished yet.  I kind of wish I could keep it here because I just love it.


I haven't yet decided what to store on these shelves.  
I was originally thinking of using it as fabric storage, but it would certainly be a shame to cover up that Amy Butler gorgeousness. 

So for now, I have some precariously placed spools of thread.

So, what do you think?  What would you use this piece for?  Fabric storage?   Notions?  Books?


6.15.2013

The Chain Stitch: An Embroidery Tutorial


Last month, I guest posted over at A Jennuine Life and I am reposting the tutorial here for you guys! 

Today, I am going to show you how to do the chain stitch I used for my daughter's new shirt, so grab your supplies and sew along with me:)


Before I begin, I just wanted to share a few examples of hand embroidery projects I have worked on over the past year:

If you have never hand embroidered, you should really give it a try.  It might seem intimidating, but it really is simple and so rewarding.  

An easy stitch to start with would be a backstitch.  A few months ago, I created a tutorial for a basic backstitch over at Sew Mama Sew, which is a great beginner stitch and you can read the full tutorial by clicking HERE.


Okay, let's get started on the chain stitch now!
(I will share how to do the balloon another day:)


You will need:

*embroidery hoop
*embroidery thread ( I use 2-3 strands)
*scissors
*water soluble fabric marker
*fabric that you want to embroider

 Here is a basic chart for how to make a chain stitch, but I will also describe it in detail below.


Please excuse my chippy fingernail polish… it appears that I am a bit rough on my hands :)


Get your hoop, fabric, needle, thread, and scissors.

Trace out the words/picture that you want to stitch with your water soluble fabric marker

Thread your needle with 2-3 strands, tie the end into a knot.

Bring your needle up through the bottom of the fabric and pull all the way through (it will stop because of the knot you made)

Now, go back down through the same hole you just came up through.

But don't pull all the way through.  Stop when you have created a loop.

Bring your needle up through the fabric again… about a 1/2 inch away from your loop.  

Lay the loop down and bring your thread up through it.

Tug the thread and you have now created your first chain!

Repeat this process.  Go back down through the hole you just came up through, create a loop, come up through the fabric, thread through the loop and tug.

When you are ready to finish your chains, simply go past your last loop and go down through the fabric and knot.  This will secure your last loop to the fabric.

Chain Stitch!

My daughter's shirt went from cute

To super duper cute!

And she absolutely loves it
and that is what truly matters