
The Kipper Capris: Pattern and Tutorial

The Kipper Capris are currently available in size 4 (I hope to have the time to do multiple sizes soon) and they feature an adorable scalloped cuff.

Look at the cuteness!

I have already made Ainsley several pairs for when she goes back to school.

As of right now, I only have the pattern ready for a size 4, but I promise to add more sizes eventually!
Supplies needed for a size 4:
*little less than 1 yard of main fabric
*approximately 1/4 yard for cuffs
*2 buttons
* 1 inch elastic cut to 20.5 inches
(measure your own child for accuracy)
*fabric marker
*pattern pieces found HERE
(please read the instructions below for piecing the pattern together)
How to Print and Tape Your Pattern Pieces
Download and print your size 4 Kipper Capri pattern pieces HERE, making sure to print at full size and check your 1 inch squares for accuracy. Tape the sheets together, but do NOT overlap. (You will notice that I had issues with my scanner and a few pencil lines will need to be filled in by you before cutting. Nothing major, but it has prompted me to finally order my new scanner.)
Cut out the pattern pieces on the solid lines.

Cut your leg cuff piece out on the solid outer line, not the scallop…. you want it to be a rectangle to start with.
(we will be doing the scallop in a bit)

Cut out your fabric according to each pattern piece.
You will have 2 front pieces and 2 back pieces and 2 cuffs.
(make sure you cut your front and back pieces so that they are mirror image and cut your cuffs on the fold as indicated)

All seams are sewn with a 1/2 inch seam allowance.
With right sides together, sew the front pieces together along the crotch (as indicated by the yellow line). Do the same for the back pieces. Serge or zig zag your seam.

Open up the back and the front pieces and place them right sides together. You will notice that the front is narrower than the back.

Sew up the side seams and the inner leg seams. Finish with a serger or a zig zag stitch.

Now, it is time to make the waistband casing.
Fold and press 1/2 inch.

Fold and press another 1 1/4 inches.

Sew close to the bottom of the entire waistband, leaving a 2 inch opening in the back. This will create the casing for your elastic.

Grab your one inch elastic.
(cut to 20.5 inches for my almost 4 year old daughter, but make sure to measure your own child to get the best fit)
Attach a safety pin to one end.

Feed the elastic through the casing.
Once fed all the way through, overlap the ends of the elastic a bit and sew together with a zig zag stitch to secure.

Sew your casing closed.
This is a good time to add your labels or a ribbon to allow the child to see where the back of the pants are.

Let’s make the cute cuff!
You have two options with this pattern… you can leave it as just a rectangular notched hem cuff or you can be super fun and use the scalloped edge cuff! I am going to show you how to make the scalloped edge today.
Grab your 2 cuff pieces and fold them together lengthwise with right sides together.

Grab the cuff pattern piece and cut out the scallops along the lines

Now, transfer the scallop markings with a fabric pen to your folded cuffs, making sure the bottom of the scallops are towards the folded edge.

Using your pen lines as a guide, sew the scallops.
(go slow!)

Trim close to the edge of stitching.
Clip up into the scallops to get a nice clean line when you turn right side out.
(don’t clip THROUGH the stitching, just clip close to it)

Turn right side out and press.
Form a loop with one of the cuffs. Overlap the ends slightly and baste it together.

Slip the cuff onto the right side of the pants hem, lining up the raw edges of the cuff and the hem. You want the notched part (the part you just joined together) to be on the outer leg seam.
Stitch together.

Serge or zig zag to finish.

Flip the cuff down, press the seam towards the pants, and top stitch.

Now, flip the cuff back up towards the pants, leaving about 3/4 inch of cuff inside. Press. (next time I make these, I will probably make sure the seams are done a different way so that you don’t see any seams at all… stay tuned for more on that!)

Attach a button to each side to secure the cuff.
You may also do a small hand stitch on other parts of the cuff to tack it down even more.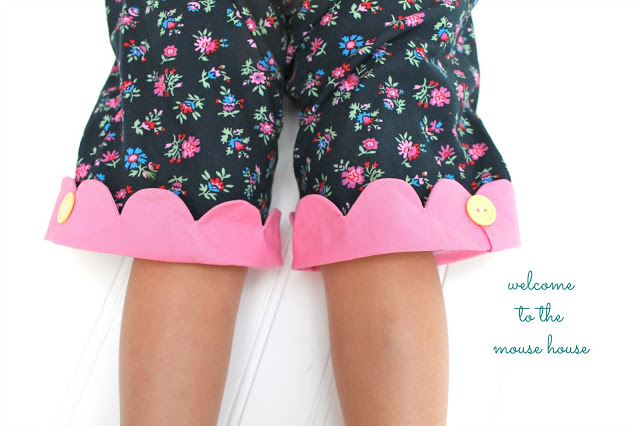


And that is it! The scalloped version takes me about 45 minutes, whereas the basic rectangular cuff version takes me only 30 minutes. These are perfect for back to school and fall/spring playwear! Perhaps make them in flannel or knit and use them for pajama pants… the possibilities are endless!


This kid….

…cracks me up!