How to Draft a Basic Bodice: Tutorial

Basic Measurements
1. Bust Circumference: Your measuring tape goes around the fullest part of your bust.
2. True waist circumference: Your measuring tape goes at your waist, not where you wear your jeans. Feel the area between your last rib and the top of your hip bone.
3. Low hip circumference: Your measuring tape goes around the fullest part of your hip.
4. Bust separation: You will use this measurement to find the placement of your darts. I have not been able to find a more accurate translation to this term, but it refers to the measurement between the apex of both breasts.
5. Waist down from high shoulder point (front and back. It’s not the same!): Your high shoulder is, basically, the top of shoulder. Visualize where your shoulder seam would be and measure from there to your true waist. The measurement in your back will be shorter.
6. Armhole height: The measurement from your high shoulder point to the bottom of your armhole. My mother used to have me hold a pencil underneath my armhole and measure until that point.
7. Low hip down from waist: This measurement is, basically, the length of your hip. Measure from your true waist to the end of your hip bone.
8. Length of bodice: How long you want your top to be.
9. Neck width: Basically, the measurement of the base of your neck, from one side to the other.
10. Shoulder width:The measurement from your neck to where your sleeve seam would be.
11. Front neck drop (back neck drop): How much of a cleavage you want on your top.
12. Shoulder drop: This measurement is usually a standard, and refers to the angle on your shoulder, about a 1/2″.

1.Prepare your paper: I like to use croquis paper, but I have used Kraft paper in the past, newspaper, and even taped-together 8×11 sheets! Make sure you have enough to reach your widest measurement and, if possible, put it on the fold. Some pattern modifications are easier done if you can spread the front bodice open. Trace a line an inch below the edge of your paper and plot point # 1 at the very corner.
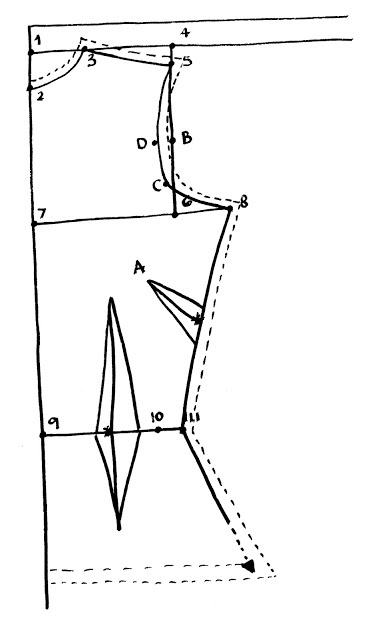
2. Plot Front Neck Drop: From # 1, measure front neck drop and plot # 2.
3. Plot Neck Width, divided by half: Divide your neck width by half, measure from # 1, and plot # 3.
4. Plot armhole seam: To do this, you will measure from 3, to the place where you want your armhole seam to begin (which is usually where your bone is). Find this measurement and plot it on your paper as # 4. From # 4, you need to add your shoulder slope, which is that bit of an angle that our shoulders have. It is usually about 1/4-1/2″. Plot that measurement in a straight line under # 4, and mark it as # 5.
5. Plot armhole line: From # 4, downwards, find the measurement of your armhole height and mark it as # 6. Repeat this same measurement from # 1, downwards, and mark it as #7.
6. Plot bust line: From # 7 to the right, find your bust circumference measurement, divided by 4, and mark it as # 8. I learned to add just a little bit of ease there, so to your quarter bust measurement, add about a half inch.
7. Plot the waist line: From # 1, downwards, find the measurement from your high shoulder point to your true waist, and mark it as # 9. To the right of # 9, find your true waist circumference measurement, divided by 4, and mark it as # 10. Add about an inch and a half for dart placement, and mark that dot as # 11.
8. Plot the bust dart: From # 1, downwards, find the measurement from your high shoulder point to the fullest/highest point in your bust, and mark it as *. Then, find the measurement of your bust separation, divide that by 2, and mark it as A. To make the bust dart, find the half point between 8 and 11 and mark it as *. Measure 3/8″ to either side of * and trace the lines toward A, stopping 1″ away from A.
9. Plot the waist dart: Find the half point between # 9 and # 11 and mark it as *. Measure 3/8″ to either side of * and trace the lines upward until about 1″ away from A.
10. Shape the armhole: There are different ways to shape the armhole, but this is how I first learned it. It is just a lot of measurements, but they get the job done: Measure the half point between # 5 and # 6 and mark it as B. from # 6, go up 1 1/2″ and mark it as C. To the right of B, measure 1/2″ and mark it as D. Now, it’s time to connect the dots! Ideally, you would do this with a sewing curve, but if you don’t have one, just do your best to approximate a nice curve on the neckline and armhole. Use your sewing curve (or trace by yourself) from # 2 to # 3. Also, trace curve on the armhole from # 4 to # 8. Join in a straight line from # 3 to #5, # 5 to # 6, # 7 to # 8, # 9 to # 11, and # 8 to # 11. This will make your basic front bodice down to your true waist; you will need to add the real length of your top. To do this, you will get the total length measurement and add it downwards from # 1, marking it as # 12. To the right of # 12, find your hip circumference measurement (the widest point if your hip), divided by 4, and plot that on your pattern, marking it as # 13. Connect # 12 to # 13, and # 11 to # 12. Add seam allowances (5/8″ or 4/8″ are pretty standard) and you have your basic front bodice!

The Back Bodice is, basically, done the same way as the Front Bodice, with a few exceptions:
-The neckline in the back will not be as low. I learned about 2 cm for the basic bodice–you make it how you prefer it.
– You use the measurement from high shoulder point to the back waist, which is, generally, different from the front measurement.
– The front bust measurement will do for the back, but in truth the measurement is going to be just a little narrower. My chart (in centimeters) lists this measurement as the quarter bust measurement, minus 1cm. Try it and see what you think.
-The dart in the back goes up until 5 cm from the bust line.
Connect the dots, add the seam allowances, and you are done!